When you want to protect your Microsoft Excel 2016 document from prying eyes, a password is probably the best way to do it. But what if you need to edit or read the content on a password protected Excel document and you don't know what the password is? The best way to do this would be to remove the password. This article will guide you through the process of unprotecting Excel 2016 without password 2016.
Part 1. Excel 2016 Password Types You Need to Know
Part 1. Excel Password Types You Need to Know
Before we share with you various ways you can use to unprotect Excel without password 2016, we thought it would be prudent to learn the password types to protect an Excel 2016 document. There are mainly 2 types to protect an excel 2016 document. They include the following:
-
Password to Open: Anyone who wants to have access to the document must input a pre-determined password to gain the access. (The method to unprotect the opening password is listed here.)
-
Password to Modify: It is set to prevent certain actions on the Excel 2016 sheet including inserting or removing rows, the ability to lock cells, formatting and other changes. (There are 3 optional tips to unprotect Excel 2016 worksheet without password in Part 2 .)

Part 2. How to Unprotect Excel Sheet without Password 2016
Whether you've forgotten the password or someone else sets these protections, there are several easy ways to unprotect the Excel 2016 document and make it editable to you.
2.1 Using Passper for Excel (Easiest and 100% Working)
The easiest solution comes in the form of a program is known as Passper Excel 2016 Password Remover. This program is the perfect tool to help you unprotect all types of passwords placed on a Microsoft Excel Document, including password to open and password to modify. It uses advanced AI algorithms to intelligently identify issues in Excel files, allowing for the quick removal of restrictions or cracking passwords. Passper for Excel comes in handy in several situations when you:
-
Have no way to edit or print an Excel sheet as you have lost the restrictions password.
-
Want to unprotect all the sheets in one click.
-
Forgot the opening password set for that Excel document.
-
Lost the Excel document's password.
-
Want to gain access to MS Excel documents with password protection.
Passper Excel 2016 Password Remover is 100% effective and secure to use. The developer (iMyFone) is trusted by Cult of Mac, Makeuseof and other famous tech sites. It is particularly effective in helping you access any Excel document and workbook because it has the necessary tools to help you bypass any password or protective measures no matter how complex it may be.

How to Unprotect Excel 2016 Sheet without Password (Password to Modify)
The following step-by-step guide shows you how easy it is to use Passper for Excel to perform the unprotecting process:
Step 1After installing and running Passper for Excel, click 'Remove Restrictions' tab.
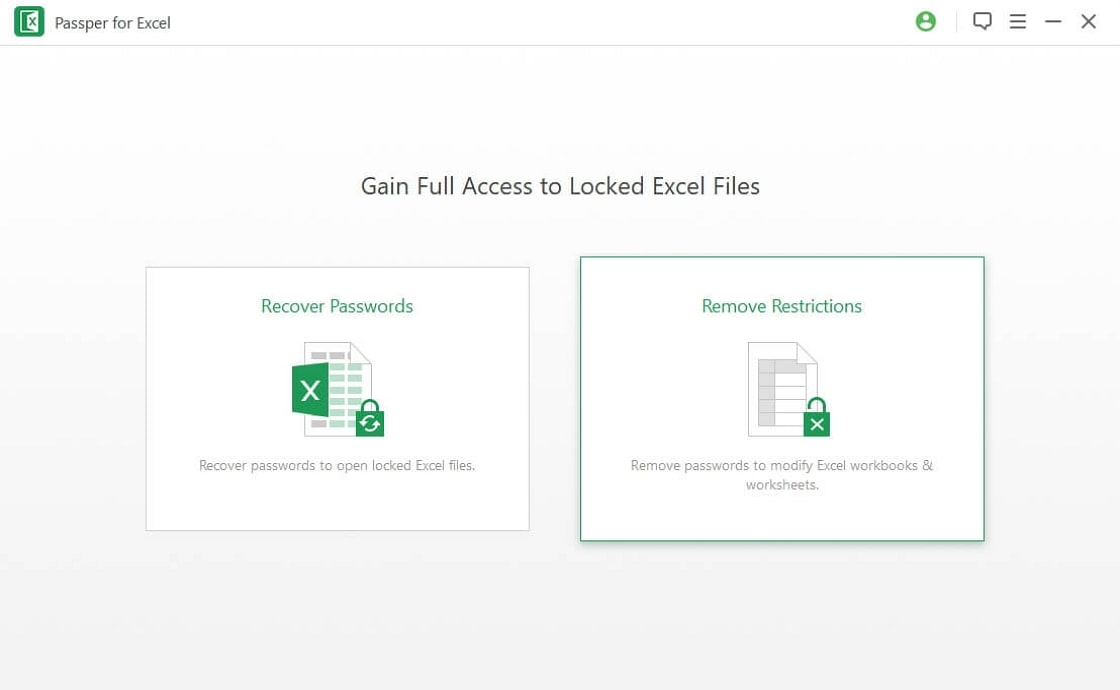
Step 2Import the worksheet or workbook with edit restrictions and click 'Remove' button.

Step 3It will take only 2 seconds to remove the restrictions. You can then edit or print the worksheet without any hassle.

Watch the video guide here:
How to Unprotect Excel 2016 without Password (Password to Open)
If your Excel 2016 is protected with the opening password, you can unprotect it by recovering the opening password with Passper for Excel.
Step 1Begin by installing Passper for Excel on to your computer. Once the program is installed, launch it by double-clicking on the program's icon on your desktop. Now, click on "Recover Passwords" and then click on "Add" to import the Excel document you want to unprotect into the program.

Step 2The next step is to choose the type of attack mode you would like to use to unprotect the document. There are 4 options to choose from on the displayed window:

Step 3As soon as you select an attack mode for your file, Passper for Excel will begin recovering the password for your document. The process may take some time depending on the complexity of the password used.
The program will display the password on your screen once it is found. You can then use the password to unlock and access the MS Excel 2016 file.

2.2 Via VBA code
You can also choose to unprotect an Excel 2016 document using VBA codes. However, it is very complex and tricky to operate. Here's how to do it;

You can only unprotect one single Excel sheet by using VBA code. If you need to unprotect all sheets, you have to run the VBA code over and over again.
Step 1: Open the document you want to unprotect and then press "ALT +F11" on your keyboard to access the "Microsoft Visual Basic for Applications" window or VBA.
Step 2: Under "Microsoft Excel Object" select any object and double-click on it to open a code-input window on the right.

Step 3: Copy and paste the following code in its entirety.
Sub PasswordBreaker()
'Breaks worksheet password protection.
Dim i As Integer, j As Integer, k As Integer
Dim l As Integer, m As Integer, n As Integer
Dim i1 As Integer, i2 As Integer, i3 As Integer
Dim i4 As Integer, i5 As Integer, i6 As Integer
On Error Resume Next
For i = 65 To 66: For j = 65 To 66: For k = 65 To 66
For l = 65 To 66: For m = 65 To 66: For i1 = 65 To 66
For i2 = 65 To 66: For i3 = 65 To 66: For i4 = 65 To 66
For i5 = 65 To 66: For i6 = 65 To 66: For n = 32 To 126
ActiveSheet.Unprotect Chr(i) & Chr(j) & Chr(k) & _
Chr(l) & Chr(m) & Chr(i1) & Chr(i2) & Chr(i3) & _
Chr(i4) & Chr(i5) & Chr(i6) & Chr(n)
If ActiveSheet.ProtectContents = False Then
MsgBox "One usable password is " & Chr(i) & Chr(j) & _
Chr(k) & Chr(l) & Chr(m) & Chr(i1) & Chr(i2) & _
Chr(i3) & Chr(i4) & Chr(i5) & Chr(i6) & Chr(n)
Exit Sub
End If
Next: Next: Next: Next: Next: Next
Next: Next: Next: Next: Next: Next
End Sub

Step 4: Click on Run > Run Sub/UserForm.

Step 5: A dialog box will appear with a usable password, meaning the process has been successful. Click "OK" to close the dialog box.

Once you close the VBA window and return to your document, you should be able to edit the document without any restrictions.
2.3 Via Editing the Filename
If on the other hand the document you are trying to edit has not been password protected, but there are certain sections of the document that you can't access or edit, the following step by step guide will help;
Step 1: Locate the Excel document you want to unprotect on your computer. The filename on the document should have a ".xlxs" extension. Change this extension to ".zip".

Step 2: Now right-click on the .zip file and choose "Extract All". This will create a brand new document in the same location and with the same name as the protected document.

Step 3: Open the "xl" folder and the "worksheets" folder which should contain all the sheets in the document (each sheet will be a file on its own).
Step 4: Right-click on the worksheet and select "Edit" to open the XML document in Notepad.

Step 5: Press Ctrl-F and then search for "sheetProtection" or "workbookProtection". This will provide you with information about the algorithm used to protect the workbook.
Step 6: Select everything contained in "sheetProtection" and delete it. Save the file before closing Notepad.

Step 7: Copy the edited worksheet or workbook file and then double-click on the ZIP file to open it, don't extract it.
Step 8: Now go to the location where you stored the original worksheet or workbook and open the "xl" folder and then the "worksheet" folder. If you edited the workbook file, you should find it in the "xl" folder.
Step 9: Paste the copied file here which will overwrite the original. Close the .zip and rename the extension back to "xlxs".
Step 10: The .zip file will go back to an Excel file which you should be able to edit in MS Excel.
It is our hope that you are able to gain access to your protected Excel 2016 using one of the methods above. Let us know if you have any questions.
