Adding a password to an Excel document can become necessary when the document has some sensitive information. Adding password is one of the oldest ways to keep a document away from prying eyes. It is secure and functional as well as highly effective, provided you think of a strong password. But did you know that there are several ways to password protect an Excel file?
Most people only know one way to password protect an Excel document, using the built-in function. While this may be a good and even effective way to add a password to a document with sensitive material, there are other far more effective ways that can really secure the document. In this article, we are going to look at all the ways you can do to protect an excel file with password and make it more secure. Let's begin with the traditional way to protect an Excel file.
1. Password Protect an Excel File with Excel's Built-in Feature
1. Password Protect an Excel File with Excel's Built-in Feature
With the in-built Excel protections, you can choose to either add a password to protect the document or choose to add restrictions, making the document Read Only. Of course the one you choose will depend on the level of protection you need. For example, if you don't want anyone but a select few to see the Excel document in question, you may have to add a password to the document. In this way, only those with the password can open, view and edit the document. If on the other hand, you have no problems with people reading the document, but you don't want them to make any edits to the document, you can choose to make it Read-Only, restricting any kinds of edits on the document. Let's take a look at how to do the both;
Password Protect an Excel File by Setting Opening Password
You want to add a password to an Excel document to keep some people from being able to view the document. The following simple guide will show you how to add a password to an Excel document;
Step 1: Open the Excel document that you want to secure with a password.
Step 2: Click on "File" and then choose "Info".
Step 3: Now click on "Protect Workbook" and from the drop down menu select "Encrypt with Password".
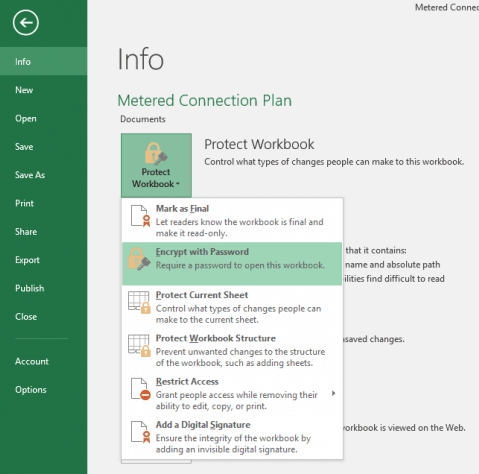
Step 4:You will be promoted to type in a password of your choice to protect the document. Pick a password that is unique as well as strong and note it down somewhere to make sure you remember it. Keep in mind that you will lose all access to the Excel document if you forget your password.
From now on, when you open that document you will be prompted to enter a password before you can access it. It is however important to note that this password is only applicable to this particular document and not all Excel files. If you want to protect other Excel files, you will need to follow the process above for each file.
How to Protect Excel Workbook by Setting Edit Restrictions
It is also possible to protect the Excel Workbook and sheets by setting edit restrictions. This means that someone looking at the document may be able to read it but they will need a password to make any changes to the document. The following are the specific steps to help you do that;
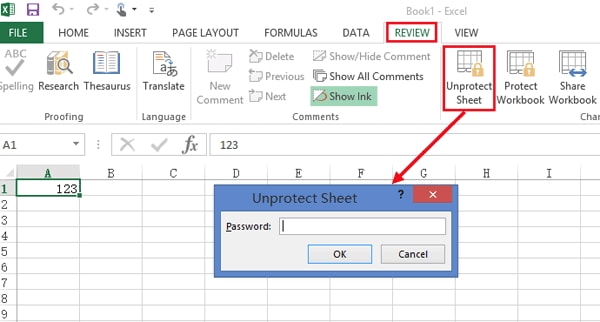
Step 1: Open the Excel Workbook that you want to protect and then click on the Review tab.
Step 2: Under "Review" option, click on "Protect Sheet" or "Protect Workbook".
Step 3: In the Pop-up window that appears, select your options and then type in the password you want to use to protect the workbook. Make sure that the password you choose is both easy to remember and at the same time not too obvious. Click "OK" when you're ready.
Step 4: Now click on "File > Save As",
Step 5: When the "Save As" dialogue box appears, type in the filename you would like to use and then select the "Tools" drop down menu and choose "General Options".
This process enables you to protect the whole workbook. You also have two layers of encryption with a password; one at the sheet level and the other at the workbook level.
2. Password Protect Excel File via ZIP/7SIP/WinZIP
If you want an added layer of protection for your Excel document, you can choose to add the document to a ZIP archive and then protect the archive with a password. This is a great way to password protect more than one Excel document at the same time since you can archive more than one file. It is also a secure way too send multiple Excel files to a recipient. Here's a guide to show you how to do it;
Step 1: Prepare the zip archive tool 7ZIP or WinZip. If you don't have either of them on your computer, download and install it.
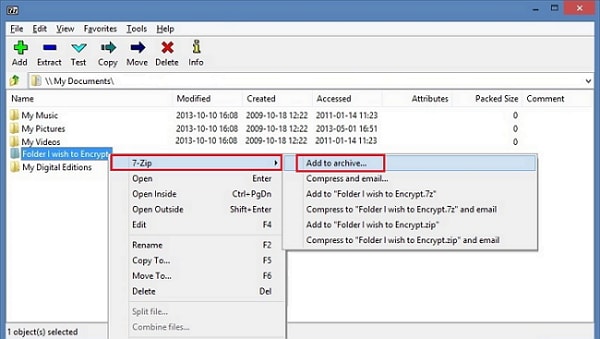
Step 2: Now locate the Excel file you want to protect and then Right click on it and choose 7ZIP > Add to Archive. If you want to add multiple files to the archive, select them all and then right-click.
Step 3: Under "Encryption" in the dialogue box that opens, enter the password twice and then click "OK" to protect the file or files in the encrypted zip archive.
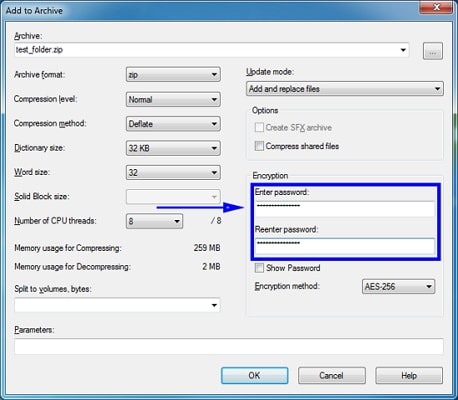
The next time you open the archive, you will need to use the password. Keep in mind that this doesn't encrypt the Excel document itself. It is the archive that is encrypted which makes it the best way to sensitive Excel documents to someone.
3. Password Protect an Excel Document via WinRAR/RAR
Another way to password protect an Excel file or multiple excel documents is to use WinRAR or RAR. Like the second option we've seen above, this one is also one of the best ways to secure a document that you want to send to someone else since it uses the same parameters as the method above. Here's how to do it;
Step 1: Install WinRAR archive software on to your computer if you don't have it already.
Step 2: Now locate the file or files you would like to password protect. Right –click on the file (for multiple files, select all of them first) and then choose "add to archive".
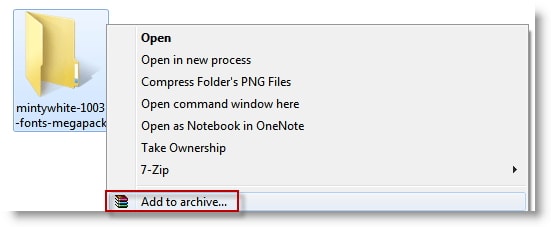
Step 3: In the "Archive name and Parameters" dialogue box that appears, set the password.
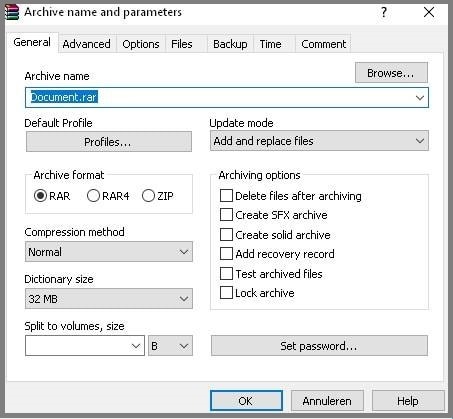
Step 4: Click "OK" to save the Excel document and password protect it in RAR archive.
Those are just some of the most effective ways to password protect an Excel file or Excel workbook. You can choose a method depending on the level of protection you want for your document. It is however important to note that you need to set a password that you'll remember. Or you may lose access to the document if you don't know the password.


