You may have a computer at home or office with Windows 7 that is used by more than one person. In such a case, each one of them would have a different account to use. Gradually, there would be multiple accounts on your computer. Later on due to any reason, you may want to remove someone's user account. If you want to know how to remove user account in Windows 7, we will tell you how to do it easily in this guide.
Part 1: Before You Remove User Account
Part 2: 5 Ways to Remove User Accounts in Windows 7
● Way 1. Using Passper WinSenior to Remove User Account in Windows 7
● Way 2. Remove User Account from Control Panel in Windows 7
● Way 3. Remove User Account in Windows 7 Using Command Line
Part 1: Before You Remove User Account
Before you remove a user account, an important thing to be done is to back up the data stored in that user account. When you remove a user account using some of the ways listed below, you may be given an option to save their files. It is advisable to take a backup before you delete. The reason is that the person may have saved different types of files, including audio files, music, video, etc.
It is better to take a backup of files manually before you remove the user account. This will prevent problems later, if you realize that you need the data. Log in to the user account and take a backup of all the folders to an external hard disk, USB drive, or SD card before you remove the account. Make sure you back up all the folders before you remove the account.
Part 2: 5 Ways to Remove User Accounts in Windows 7
We will now tell you how to remove user account in Windows 7 easily and effortlessly using five different ways. Go through each of the ways and find out which of the ways are suitable for you. Please note that this deletion is permanent and you cannot recover an account deleted. So, use these options with care.
Way 1. Using Passper WinSenior to Remove User Account in Windows 7
When you want to remove a user account, you would need access to the administrator login or a login that is equivalent to administrator, as deleting an account requires super user rights. It may be possible that you don't have access to the administrator account for whatever reason. In such a case, Passper WinSenior is the best option to use. This software allows you to not just remove accounts but also reset lost passwords, remove the password from an account and even create an admin account.
You can install this software on your computer and use it to remove a user account in Windows 7. Passper WinSenior can be used on all versions of Windows, including XP, Vista, 8, and 10. There is even a trial option available for you to try out the software before buying.
Free DownloadFor Win 10/8/7/XP/Vista
This is how to remove user account using Passper WinSenior software:
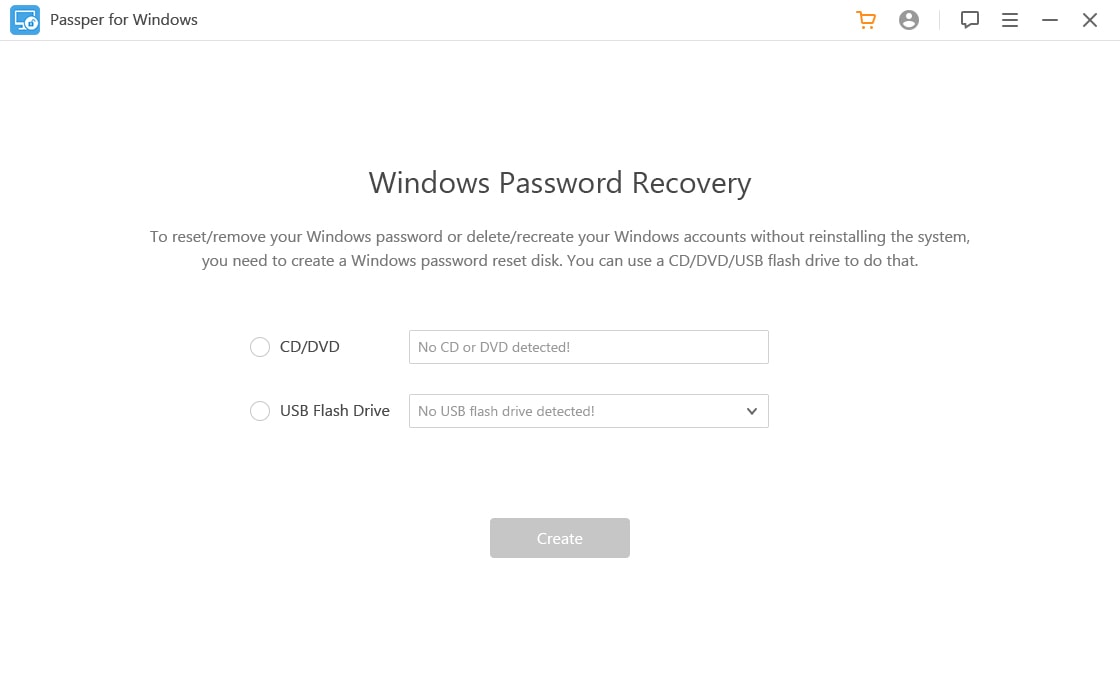
Step 1 You need to create a reset disk. To do this, install the software, insert a disc or USB drive, and launch the software. Select the option for CD or USB and click Continue, it will create a reset disk.
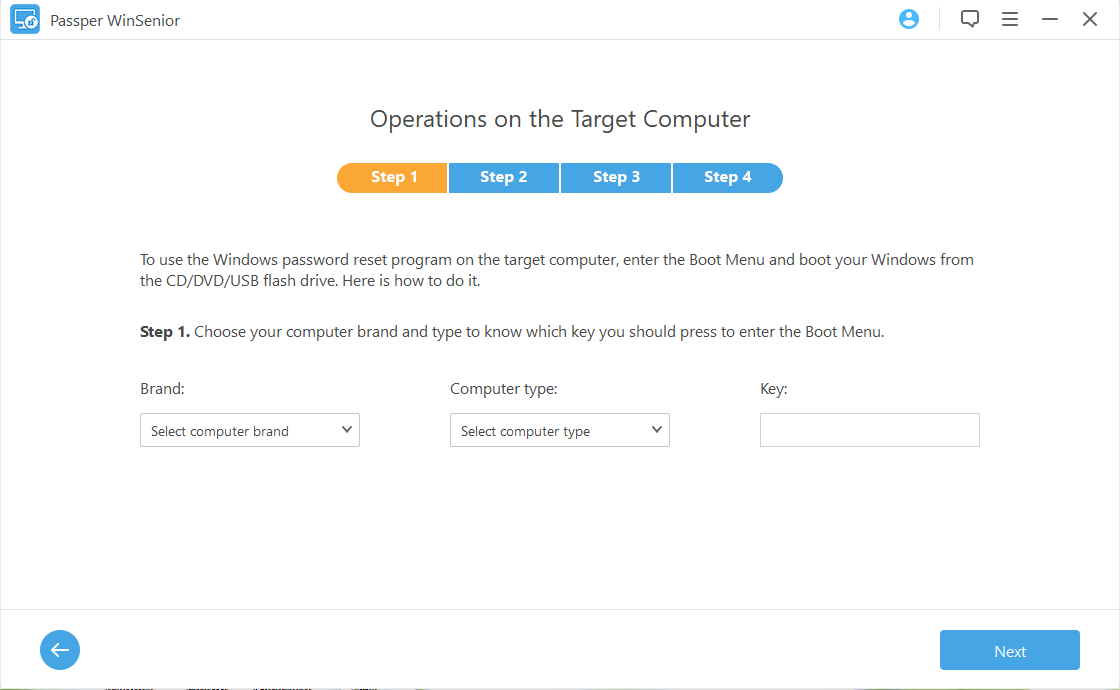
Step 2 You will see the option Operations on the Target Computer. Select the brand and type of your computer, you will be shown the key to be pressed while booting the computer and click Next.
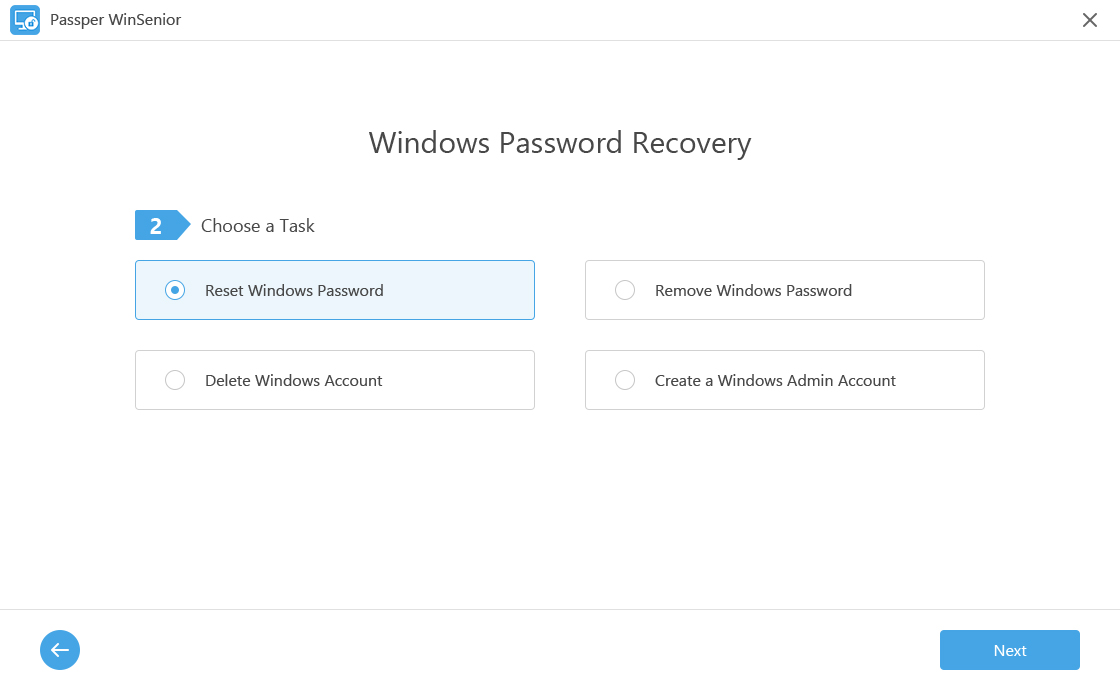
Step 3 Now insert the reset disk in the drive of your computer and press the key indicated to boot from the reset disk. Follow the instructions on the screen and the Windows Password Recovery screen will show up. Choose a system and choose Delete Windows Password in the next page.
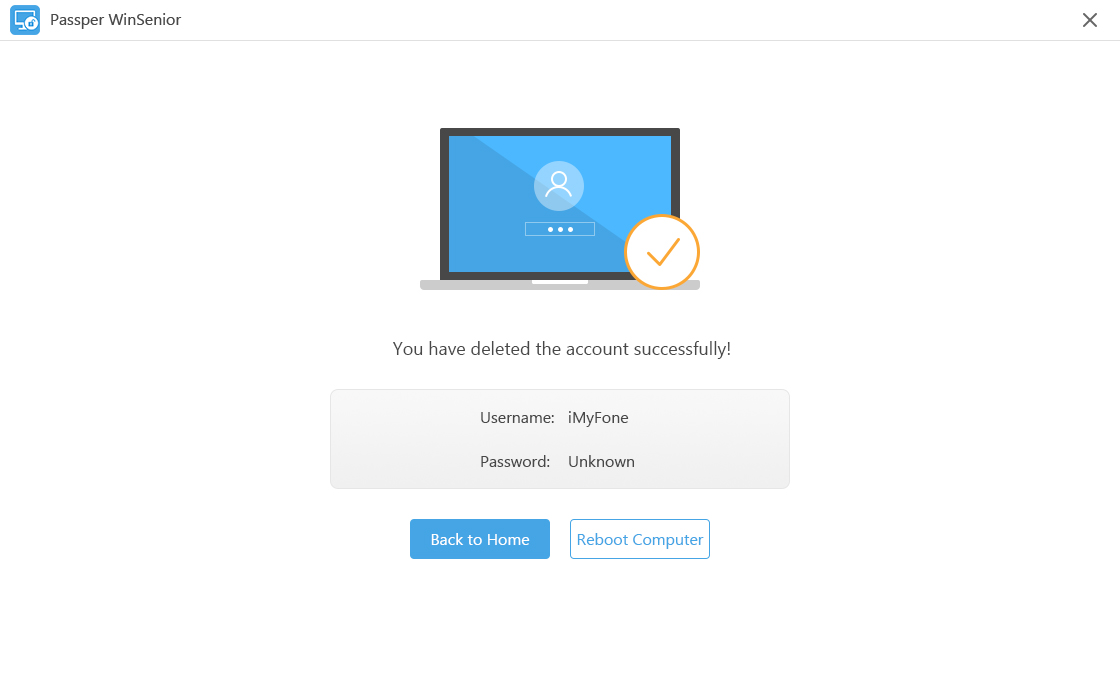
Step 4 You will then be shown the list of all the accounts on your computer system. Make sure you have taken a backup earlier and then select the user account and click Next. You will be notified once the user account has been removed successfully.
Way 2. Remove User Account from Control Panel in Windows 7
You can remove any user account in Windows 7 through the Control Panel that allows you to change the Windows settings. Please note that you must be either logged in as administrator or should have administrator privileges for your account to use this option.
The following steps tell you how to remove user account in Windows 7 through the Control Panel:
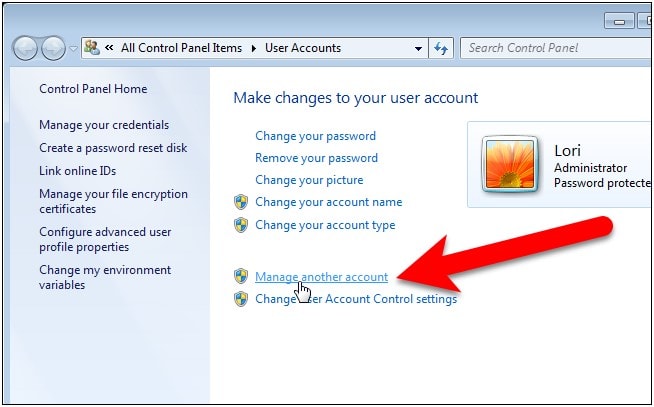
1) Click on Start and select Control Panel, then select the option User Accounts. From the next screen, select the option Manage another Account.
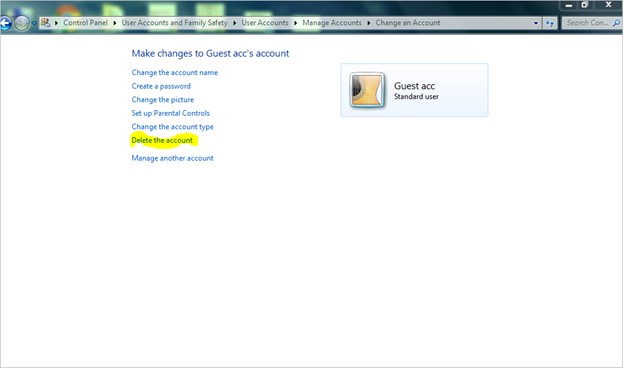
2) You will then be shown the list of all the user account on the computer. Select the account that you want to remove. You will be then be shown a list of options. Select Delete the account.
3) You will be promoted to either Delete files of the account or Keep files on the system without deleting it. If you have taken a backup, you can select delete else save the files.
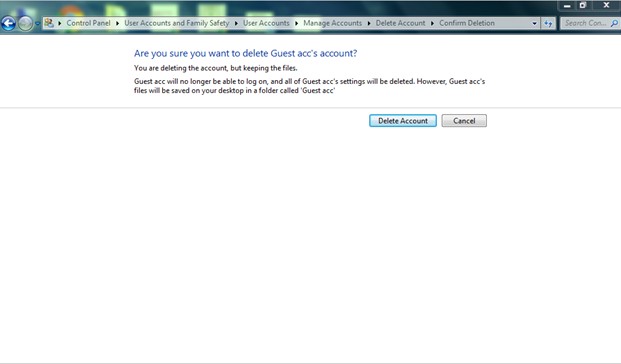
4) You will be then asked to confirm if you want to delete the account, select Delete Account. If you chose to keep the files, they will be moved and then the account will be deleted.
Way 3. Remove User Account in Windows 7 Using Command Line
In this method, you can remove any user account of your choice by typing a command using the command line. This is a quick way preferred by those who are expert users and have been used to working with MS-DOS.
The following steps tell you how to remove user account by using the command line in Windows 7:
1) Click on run and type CMD, it will show you the Command Prompt. Right click on it and select Run as administrator. This is needed, as you require administrator privileges to delete an account.
2) You will be then shown the command prompt on a black screen. Type the following command net user <username> /del, where <username> is the name of the account to delete. You will need to take care while using this option as you are not asked any confirmation nor prompted to backup files.
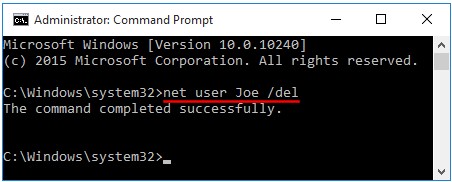
3) That's it. Once the account is removed, it will disappear from the login screen.
Way 4. Remove User Account through Computer Management
This option to remove a user account uses the Computer Management option through which you can access all the system tools and manage your computer. To use this option, you need to use the administrator account or an account with administrator privileges. You also need to use the local users and groups option.
Following are the steps to delete a user account using Computer Management.
1) Firstly, search Computer Management from Start menu. Click to open it.
2) You will now be shown a list of options in the Computer Management window. Select Local Users and Groups. Click on Users in the 2 options listed below.
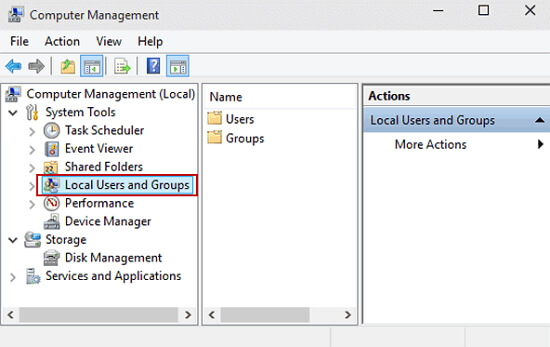
3) On the right pane, you will be shown the list of all the users. Select the user name that you want to remove. Now right click on it and select the option Delete.
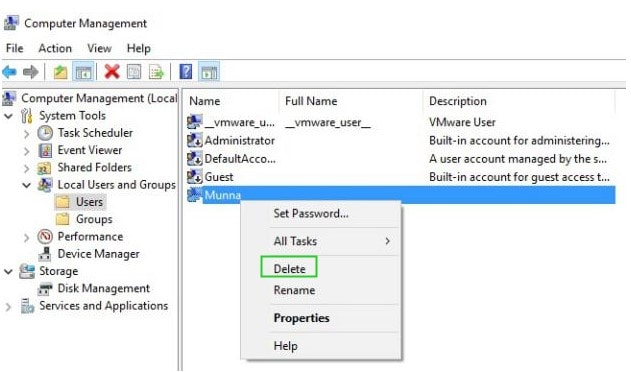
4) You will be shown a window asking you to confirm deletion. If you have taken data backup, then select Yes, and the user account is permanently removed.
Way 5. Use Netplwiz to Remove User Account in Windows 7
Windows 7 has many tools that allow you to manage user settings, including managing user accounts. One of these tools is Netplwiz, which is a utility to manage user accounts.
Here is how you can use Netplwiz to remove a user account:
1) Press Windows key + R to open the Run dialog. Then type Netplwiz.
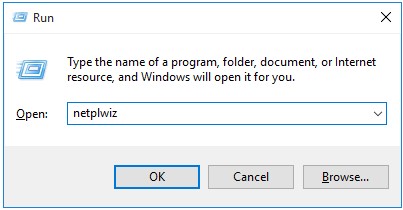
2) A window opens and you will see a check box saying User must enter a user name and password to use this computer. Select this option.
3) Then select the user name for the list and click on Remove.
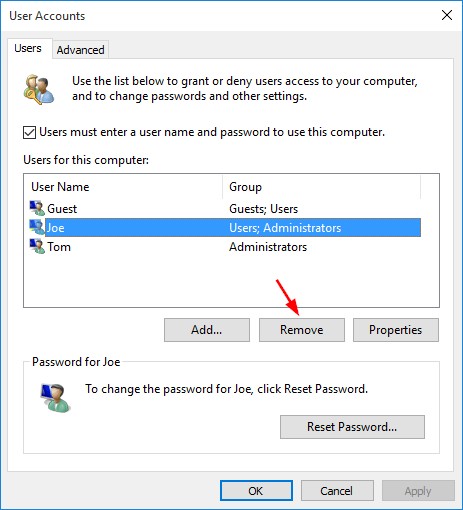
4) Confirm your choice by selecting Yes and the account will be removed.
In this guide, we explained how to remove user account in Windows 7 and listed 5 ways to do so. Four of these ways require access to the computer's administrator account. In case you do not have access to the account or have forgotten the password, then you can use Passper WinSenior to remove the user account without even having to log in. You can choose any of the methods that meet your needs.


