In Microsoft Excel, if you apply protection on a worksheet, all the cells on the sheet will be locked and could not be edited anymore. However, it is also possible to unprotect cells in Excel to enable cell editing while keeping other cells locked. It is user's choice to lock only specific cells or a range of cells before protecting Excel worksheet. MS Excel also gives the option to enable specific user to edit specific cells (or a range of cells) in a protected workbook.
Part 1. Unlock Cells in Excel with Known Password
● 1.1 Unlock Cells in Excel to Unprotect a Sheet
● 1.2 How to Unprotect Certain Cells on a Protected Excel Sheet
Part 2. Unlock Cells in Excel Even if You’ve Forgotten the Password
Part 1. Unlock Cells in Excel with Known Password
1.1 Unlock Cells in Excel to Unprotect Sheet
You can always unlock cells in a worksheet if you have the password for this sheet. You just need to remove the protection of the worksheet. This can be done with the following two Methods.
Method 1: Right click the "sheet" tab and then from the "context menu", select the option of "Unprotect Sheet".

Method 2: Go to the "REVIEW" tab and click the "Unprotect Sheet" in the "Changes" group. You can edit any cells as soon as the Excel sheet is unprotected.

1.2 How to Unprotect Certain Cells on a Protected Excel Sheet
It is also possible that you want the users of the Excel file to edit certain cells or a range of cells. This can be achieved by using "Allow User to Edit Ranges" option or "Format Cells" option.
Method 1: Allow Certain Users to Edit Selected Cells
If your computer is on a domain and the operating system is Windows XP or higher, you can set permissions for the specific domain users so that they may edit specific cells or ranges of cells.
Step 1. Open the unprotected Excel worksheet and select the range of the cells that you need to unprotect.
Step 2. Next, move to the "Review" tab, then go to the "Changes " group, select the option of "Allow Users to Edit Ranges".

Keep in mind that this feature will only be available if your Excel worksheet is unprotected. If you see that the button for "Allow Users to Edit Ranges" is greyed out, you need to unprotect the sheet first by clicking "Unprotect Sheet" button in the "Review" tab.
Step 3. Next, to add a new range, you need to click the "New…" button in "Allow Users to Edit Ranges" dialog box.

Step 4. When the dialog box of "New Range" is opened, go to the "Title" box, here you can set a range name for your cells. (Default name is "Range1"). Next, you need to enter a cell or range of cell reference in the "Refers to cells" box. (There may be currently selected cells or ranges of cells included, by default).
Step 5. Type a password in the "Range password" box. Optionally, you can leave this empty, which means that you allow everyone to edit the selected range without having password. Next, press the "Permissions..." button.

Step 6. On the "Permissions…" window,click on "Add…" button, this will open a new dialog box for "Enter the object names to select". Enter the name of users to allow them to edit certain cell range. Type the name of the domain user and click "Check Names" to verify the names. This will verify the name and apply the required format. After entering and validating the names of all users to give permissions, click the "OK" button.

Step 7. Next screen of "Confirm Password" will appear, here you need to insert the password again. After this, click "OK".
Step 8. This will open the dialog box of "Allow Users to Edit Ranges". At the bottom of the dialog box, click "Protect Sheet" button to enforce the sheet protection.
Step 9. Here, you can enter a password. The password can be used to unprotect sheet when necessary.

Step 10. Re-type the password in the "password confirmation" window and click next. At this point, your Excel worksheet is protected and specific cells are also unlocked using the password that you inserted. Any user with that password can edit the cells.
Method 2: Unlock Certain Cells via Format Cells Option
Using Format Cells option to unprotect certain cells in Excel is much easier than the previous method.
Step 1: Open your target Excel worksheet.
Step 2: Select the cells that you want to keep unlocked. Go to Cells > Formats and select "Lock Cell". Once you click on it, the lock icon should not be highlighted.

Step 3: Right click on the sheet name and choose "Protect Sheet". You can type in a password to enhance the protection.
Step 4: Confirm the password you entered. Now, the certain cells that you chose before is unlocked while other cells is locked.
Part 2. Unlock Cells in Excel Even if You’ve Forgotten the Password
2.1 Using Excel Password Recovery Software (Easy Way)
Passper for Excel is one of the most popular and powerful tools to recover the opening password and remove restrictions for MS Excel as it guarantees its users that no data will be deleted from the sheets or the workbooks. It uses advanced AI algorithms to intelligently identify issues in Excel files, allowing for the quick removal of restrictions or cracking passwords. Following are some of the features of Passper for Excel software:
-
Super useful to unprotect your Excel sheet and cells.
-
It is totally secure to use Passper as it is the sub-brand of the highly recognized authorized iMyFone.
-
It supports all versions of MS Excel including: Excel 2021, 2019, 2016, 2013, 2010, 2007, 2003, 2000 and 97.
-
We offer 30-day money back guarantee if users have any tech issues with our software.
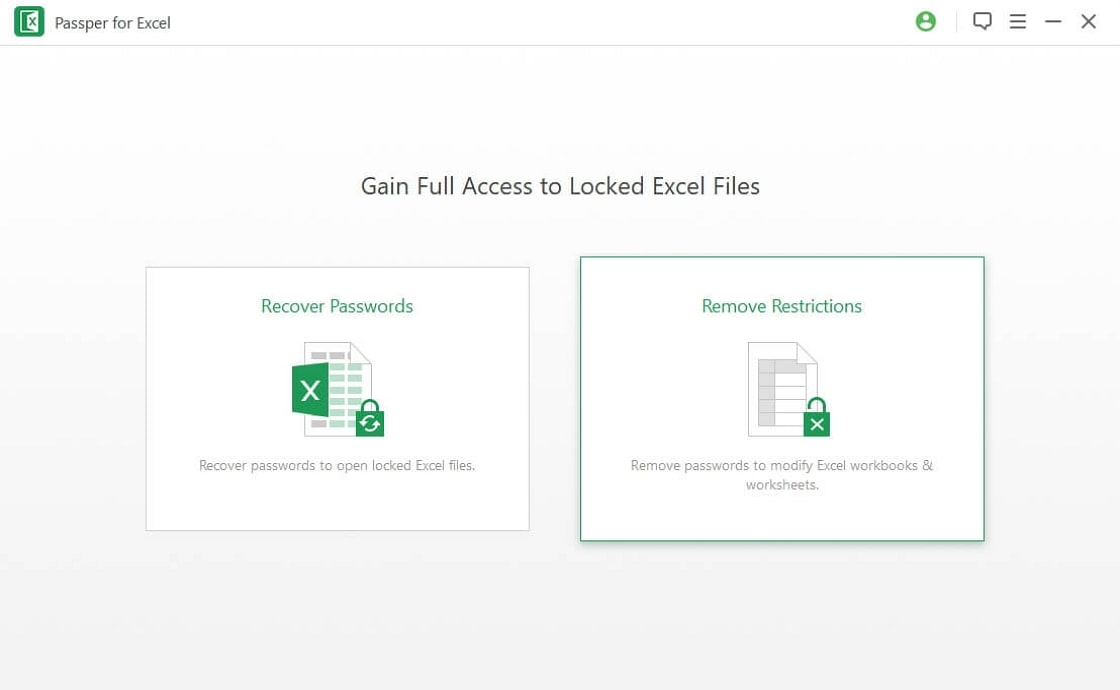
You can remove restrictions from Excel workbook/worksheet by following these steps.
Step 1. Open the program and select the option of "Remove Restrictions".
Step 2. Click on "Add" to import the Excel sheet which is password protected. When the file is imported in the program, click on the "Remove" option to remove the password protection.

Step 3. Password will be successfully removed from the file within two seconds.

So, if you do not have the password and still want to unlock the Excel sheet cells, you may follow the following two methods.
2.2 Using ZIP Software
You can use "ZIP software" to unlock cells in a Excel worksheet even if you've forgotten the password to unprotect the sheet. This method will work for you if you have Excel file with ".xlsx" format. In the case of ".xls" format, simply save the file as ".xlsx" format. Steps to unlock Excel cells without password are as follows:
Step 1. First, change the Excel file extension from ".xlsx" to ".zip" format.
Step 2. Now, you need to open this zip archive with "7-ZIP". For this, open the folder "xl > worksheet" and you can now see your excel sheets as xml files.

Step 3. For example, if you want to open sheet1 by unprotecting it. Select that xml file, right click it, then select edit and open it in Notepad.
Step 4. Search for the line/tag that begins with "sheetProtection" and delete that tag. Then save and close that xml file.

Step 5. If prompted, update the modified xml file in the ZIP archive and close the archive.
Step 6. In the last step, change the ZIP file extension back to ".xlsx" format. If all goes well, your Excel sheet is now unprotected. You can open and edit this file without using a password.
2.3 Using VBA Code
In order to unlock cells in Excel file, you need to unprotect the worksheet first. Using VBA code is one effective method to achieve this goal, but this method only useful for Excel 2010 and lower version. Following is a detailed guideline for you to unprotect cells:
Step 1: First, open the Excel file that you want to unlock. Next, use the shortcut ALT+F11 to open VBA's macro editor.
Step 2: Double-click the worksheet that is password protected. It can be found from the files listed on the left menu.

Step 3: Select Insert > Module from the menu. Paste the following code.
Sub PasswordBreaker()
'Breaks worksheet password protection.
Dim i As Integer, j As Integer, k As Integer
Dim l As Integer, m As Integer, n As Integer
Dim i1 As Integer, i2 As Integer, i3 As Integer
Dim i4 As Integer, i5 As Integer, i6 As Integer
On Error Resume Next
For i = 65 To 66: For j = 65 To 66: For k = 65 To 66
For l = 65 To 66: For m = 65 To 66: For i1 = 65 To 66
For i2 = 65 To 66: For i3 = 65 To 66: For i4 = 65 To 66
For i5 = 65 To 66: For i6 = 65 To 66: For n = 32 To 126
ActiveSheet.Unprotect Chr(i) & Chr(j) & Chr(k) & _
Chr(l) & Chr(m) & Chr(i1) & Chr(i2) & Chr(i3) & _
Chr(i4) & Chr(i5) & Chr(i6) & Chr(n)
If ActiveSheet.ProtectContents = False Then
MsgBox "One usable password is " & Chr(i) & Chr(j) & _
Chr(k) & Chr(l) & Chr(m) & Chr(i1) & Chr(i2) & _
Chr(i3) & Chr(i4) & Chr(i5) & Chr(i6) & Chr(n)
Exit Sub
End If
Next: Next: Next: Next: Next: Next
Next: Next: Next: Next: Next: Next
End Sub
Step 4: Run the code. Do this by hitting F5 on your keyboard or by clicking "run" from the menu atop the VBA code editor.
Step 5: After running the code, you'll be redirected to the worksheet. A dialog box containing a usable code will pop up. You can use the code to unprotect the sheet now.
Conclusion
Excel worksheet protection is an amazing feature giving you the flexibility to lock or unlock certain cells using a password. But if you've somehow lost or forgot the password, it can be really troublesome to retrieve your important data. Luckily, the methods described above can help you unprotect cells in Excel. It is worth stressing agagin that Passper for Excel is an amazing tool to unprotect the whole sheet even if you cannot remember the right password.
