Word provides you with a way to protect sensitive and private information to make sure that they are private and confidential. This can be easily done by adding a password to the document. If you have been using Word for a while, you no doubt know how to add a password to Word document.
But how to remove password from Word document? What if you have a Word document that is password protected that you need to open or edit and you don't remember the password? Maybe you misplaced the password and you cannot remember what the password is. Or, maybe you know the correct password but you feel that it is annoying to enter a password every time you want to open or edit the document. If you find yourself needing to remove password from Word document, this article will be invaluable to you.
Part 1. Remove Password Protection from Word to Edit the File without/with Password
● 1.1 Using a Reliable Word Password Remover
● 1.2 By Renaming Word File Extension
● 1.3 Saving AS Rich Text Format
● 1.4 Remove Edit Restriction with Password
Part 2. Remove Password from Word Document to Open the File without/with Password
Part 1. Remove Password Protection from Word to Edit without/with Password
Sometimes the document can be accessible, but the document's owner can add 'Password to Modify' or 'Password to Restrict Editing' to prevent you from modifying certain information on the document. You may be unable to format certain pages or even change the formatting styles to different types. In this situation, you need to remove password protection from the read-only Word document.
1.1 Using a Word Password Remover to Remove Password from Word Document
Passper Word Password Remover can help you in this situation. It is the ideal word password remover to help you recover a password and consequently open a password protected Word document, or simply remove edit restrictions for read-only Word files. The brand owner of Passper: iMyFone has gained many positive reviews from our users and well-known media sites, such as Makeuseof, Cult of Mac, Engadget, Techradar, etc.

Features of Passper for Word :
-
Recover any types of opening password for your Word document without damaging the current data.
-
Remove edit restriction in 3 seconds. You can easily edit, copy and modify the Word file after the restrictions are removed.
-
Highest recovery rate and fastest recovery speed are guaranteed with the advanced algorithm.
-
The recovery process can be stopped at any time so that you can resume the process at next time.
- It can remove password from Word document 97, 2000, 2003, 2007, 2010, 2013, 2016, 2019, 2021. File types like .docx, .doc, .docm and etc are supported.
Here's a step-by-step guide to show you how to use Passper Word Password Remover to remove password from Microsoft Word:
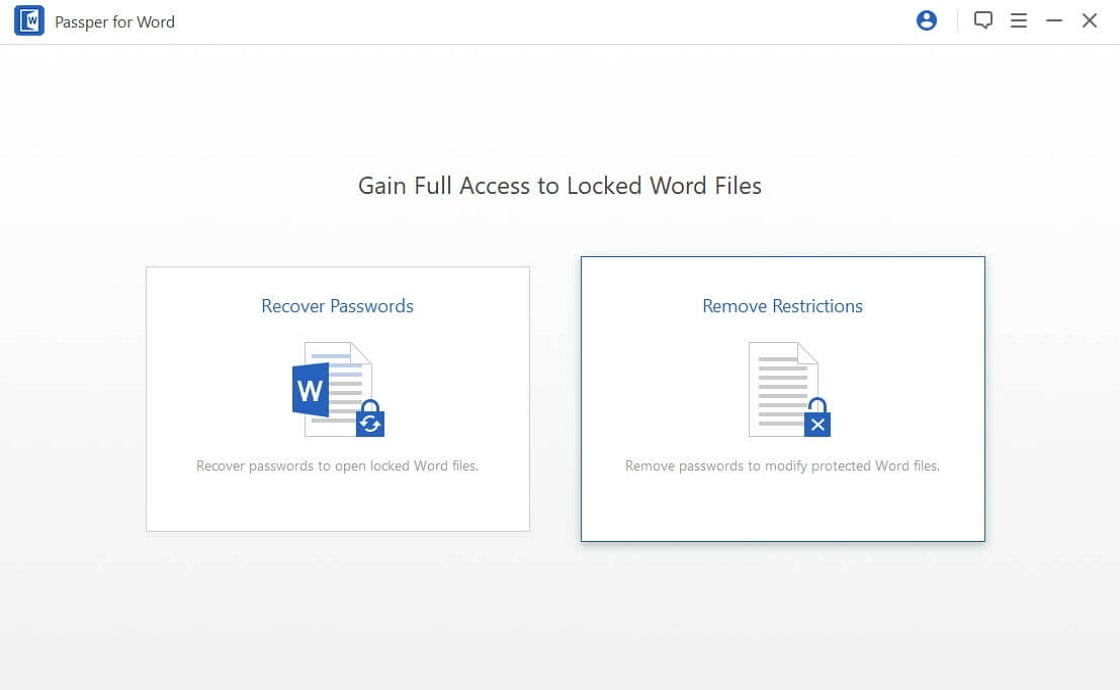
Step 1Open Passper for Word on your computer and then click on "Remove Restrictions" to begin.
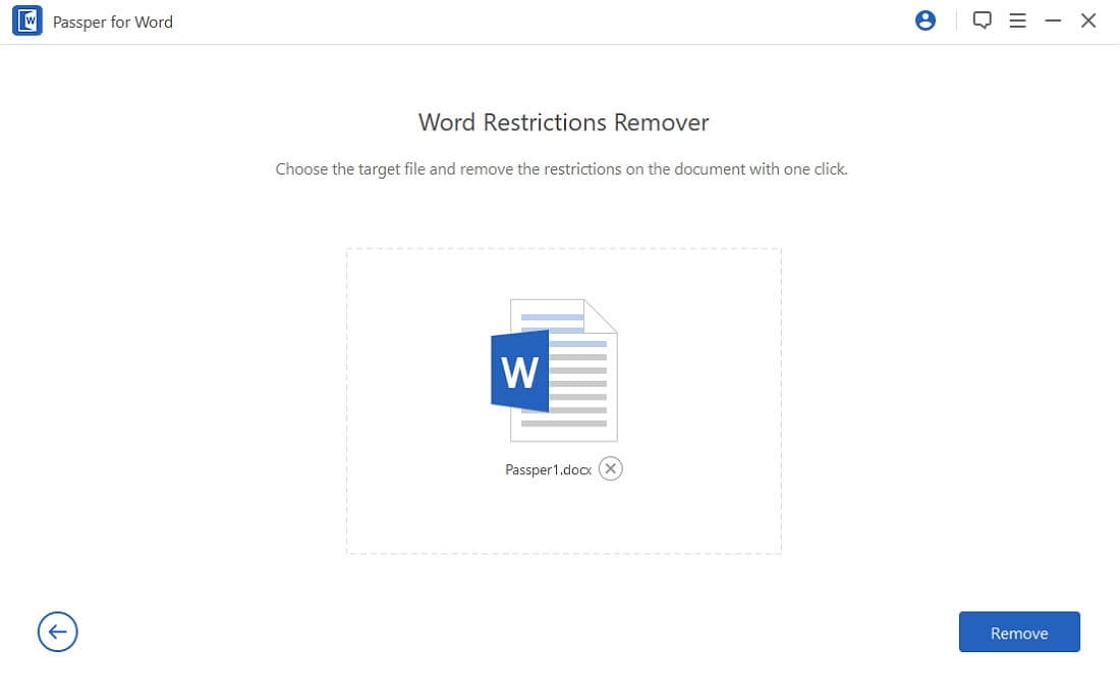
Step 2Now, click on "+" to add the password-protected Word document to the program.
Step 3Once the file is added, simply click on "Remove" and all restrictions on the document will be removed in only 3 seconds.
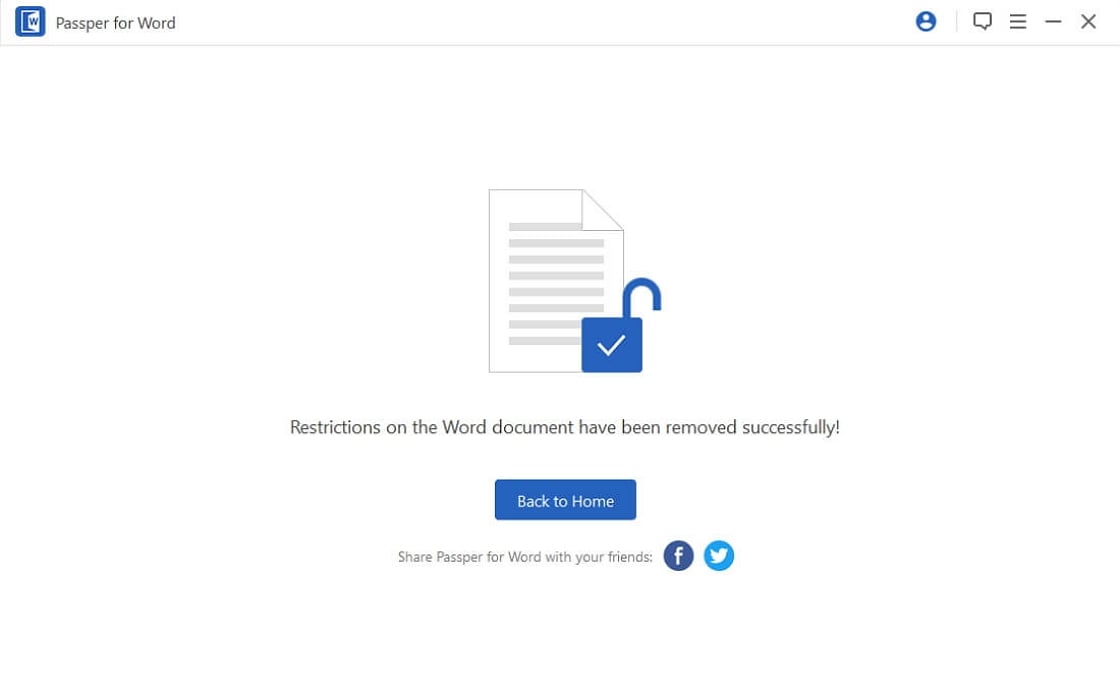
You will now be able to edit the Word document any way you want.
1.2 Remove Password From Word Document By Renaming Word File Extension
Renaming file extension is another choice to remove password from Word document if you forgot the password. However, this method is cumbersome and error-prone. We discourage you from using this wizard as you may waste too much time to figure out the whole procedures.
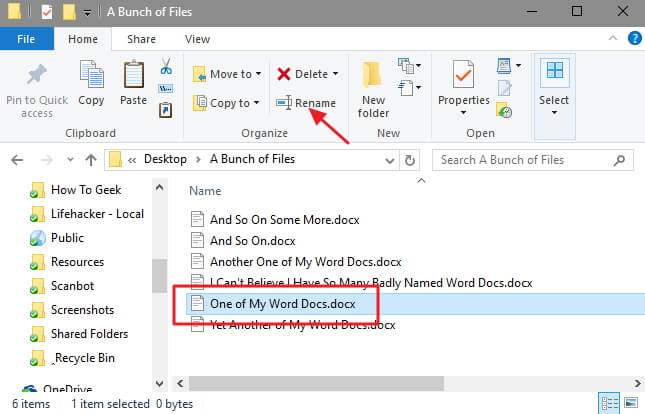
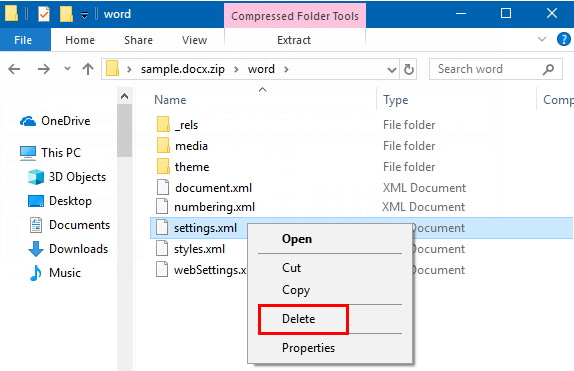
Step 1: Rename the extension from .doc or .docx to .zip and click "Yes" to confirm the file name alteration.
Step 2: Now open the "ZIP" file with Windows Explorer.
Step 3: Click on the Word folder and find the file named "settings.xml" and delete it from the list. After that, change the filename extension back to .doc and you should now be able to edit the Word file.
1.3 Remove Password From Word Document By Saving As Rich Text Format
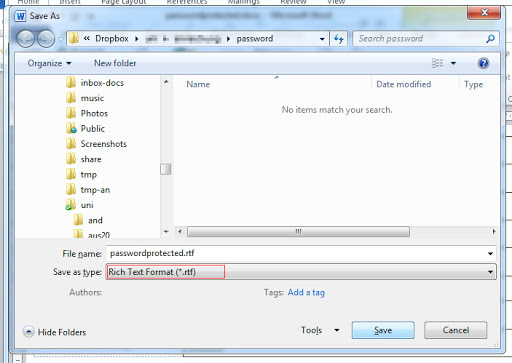
If your Word document has been restricted from editing with a password, you can save it as a .rtf file and the password protection on the document will be removed immediately. According to our test, this method works for Microsoft Office Professional Plus 2010. You can check the following steps to learn how to achieve it.
Step 1: Open your password-protected Word document and save it as a .rtf file.
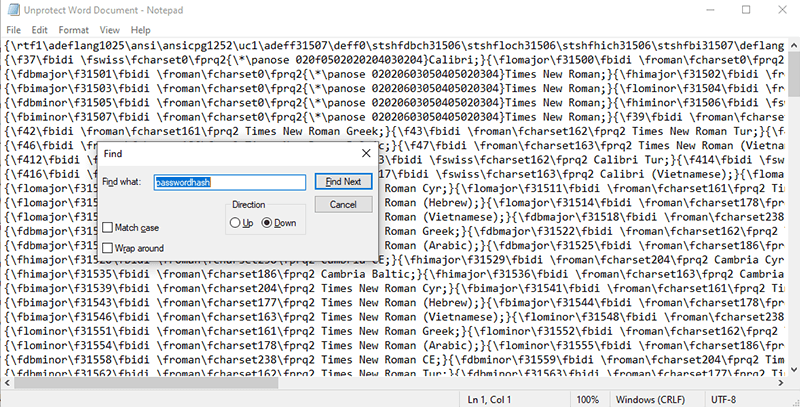
Step 2: Close all the documents. Then open the .rtf file with Notepad.
Step 3: Press Ctrl+F to find "Passwordhash" in the text and replace it with "nopassword".
Step 4: Save your operation and close Notepad. Again, open the modified .rtf file with MS Word program.
Step 5: Navigate to "Review >Restrict Editing >Stop protection". Uncheck all the boxes on the right panel. Now, the password protection has been removed from your Word document. You can keep your document as .rtf file or change it back to .doc or .docx.
1.4 Remove Edit Restriction with Password
If you know the correct password used to restrict editing from a Word document, the removal process will be truly easy.
Remove 'Password to Modify':
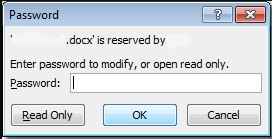
Step 1: Open the protected Word document. Enter the correct password when the following dialog pops up.
Step 2: Navigate to File>Save As. On the "Save As" dialog, tap on Tools and then select General Options.
Step 3: Delete the password in the box of Password to Modify.
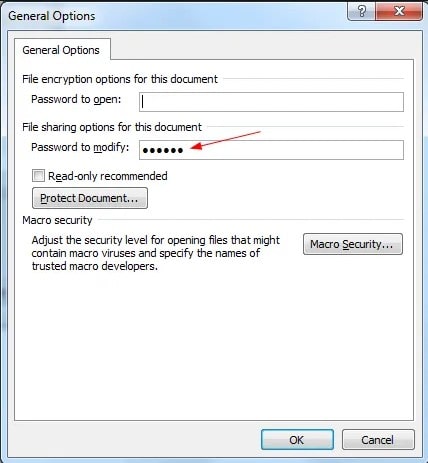
Step 4: Click OK and save your document.
Remove 'Password to Restrict Editing':
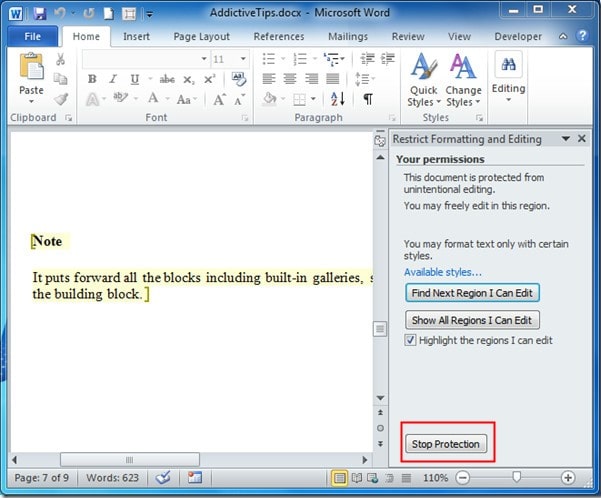
Step 1: Open your locked MS Word document. Go to Review>Restrict Editing.
Step 2: Click "Stop Protection" button in the lower right corner.

Step 3: Input the correct password in the "Unprotect Document" dialog, and click OK. Now, the password protection has been removed from your Word document.
Part 2. Remove Password from Word Document to Open the File
When you open a Word document, a message will pop up on the center of the screen requiring you to enter the password to read the file. In this case, you can choose to recover or remove the password to open the locked file.
2.1 Recover Word Password Then Remove it Manually (No Password Required)
When you don't have a password or don't remember the opening password for your locked Word document, you can still get it back with Passper Word Password Remover and remove it manually.
The following is a simple step-by-step guide to help you recover opening password from a Word Document and then remove it manually.
Step 1Install Passper for Word on your computer and then launch the program. Click on "Recover Passwords" option to begin the password recovery process.
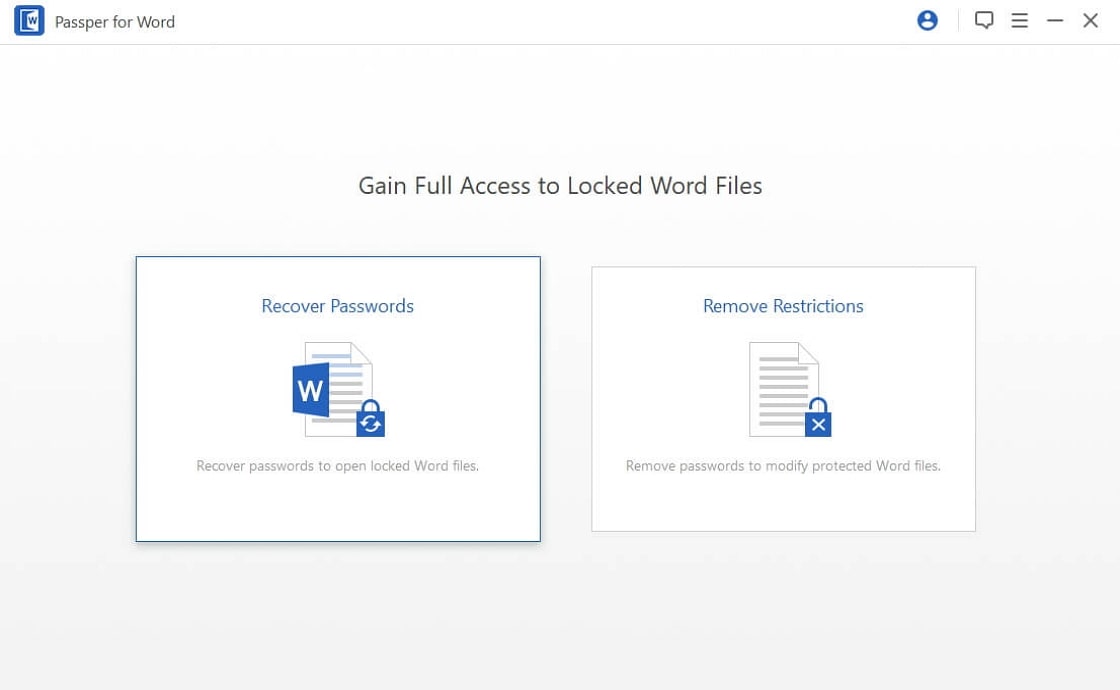
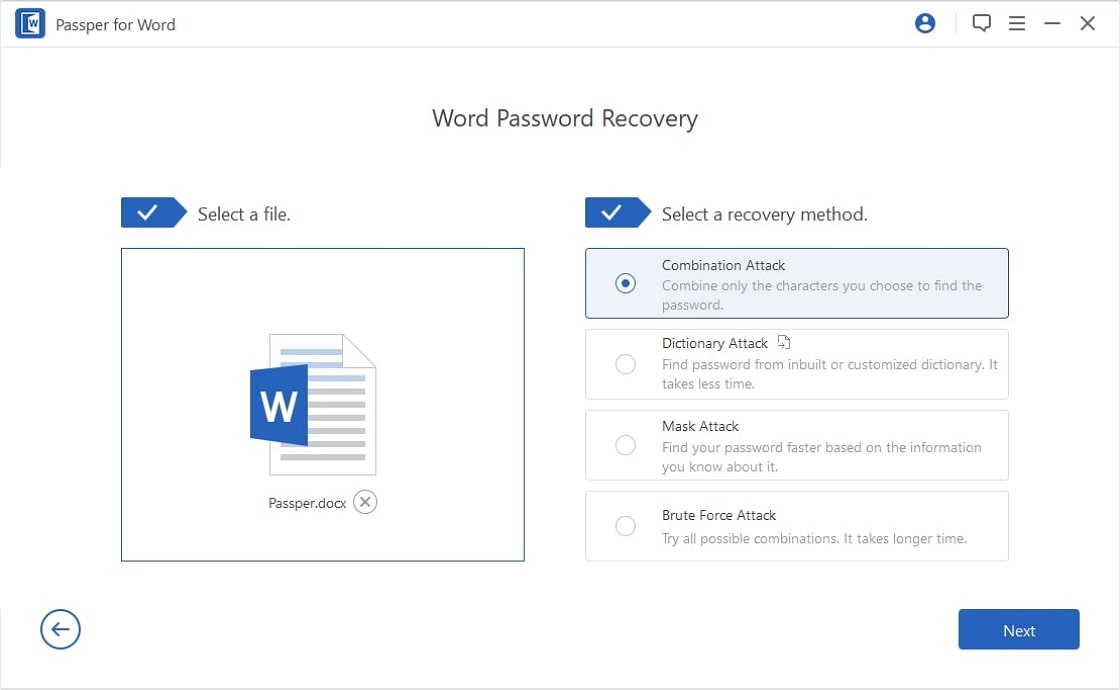
Step 2Click on "Add" to choose and import the password-protected Word document you want to unprotect.
This program has 4 basic attack modes that make it the ideal password recovery solution for any Word document regardless of the complexity of the password used. These attack modes include the following:
DictionaryAttack -This one uses the provided dictionary library to try all possible password combinations until the right one is found.
Combination Attack -This method allows you to specify the characters you want the program to randomly combine to find your password.
Brute Force with Mask Attack- This mode is helpful if you have a clue of the forgotten password. It works with the prefix/suffix, characters, special characters and even length of the password to determine the missing password. As a result, this attack mode takes a shorter time to determine the password since it has a starting point.
Brute Force Attack- This is the attack mode to choose if you don't remember anything about the password. It works by running as many possibilities as possible at random until you arrive at the best possible password. As a result, it may take a while to find a password.
Select one of the attack modes that we've talked about above, depending on your situation.
Step 3The program will then immediately begin the process of recovering the password from the document. Simply, wait for the process to be completed.
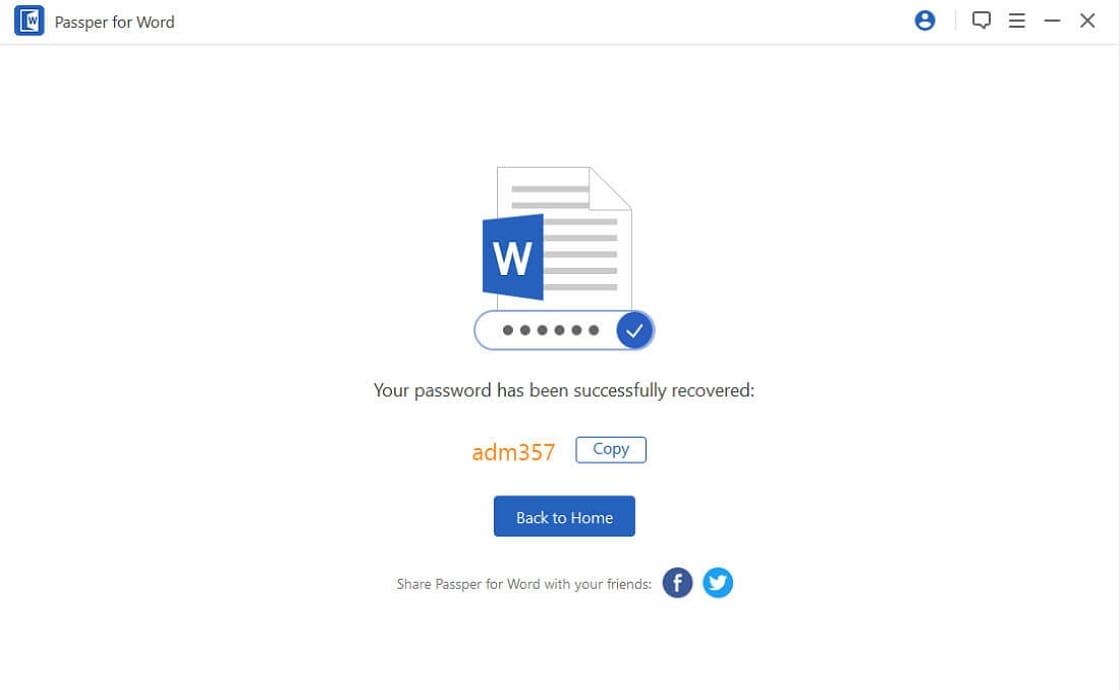
Once the process is complete, a password will appear on the screen. You can then use the password to unlock the document and then take password off Word document.
2.2 Using Original Password
If you know the original password, removing encryption from the Word document can be a simple process:
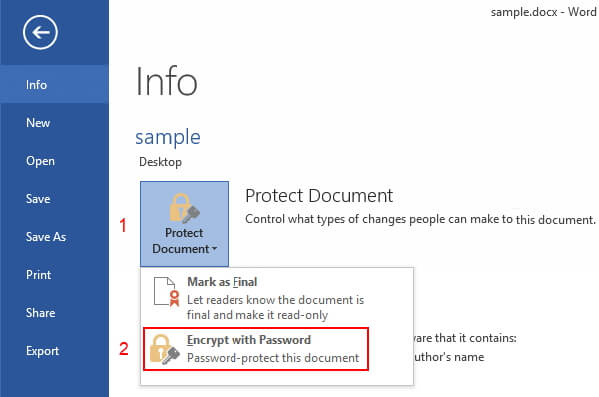
For Word 2010/2013/2016:
Step 1: Open the password-protected Word document and enter the password to unlock it.
Step 2: Click on 'File > Protect Document > Encrypt with Password'.
Step 3: Since the document is password protected, the password will appear in the 'Password' box. To unprotect the document, simply clear the password in this box and click on 'OK'.
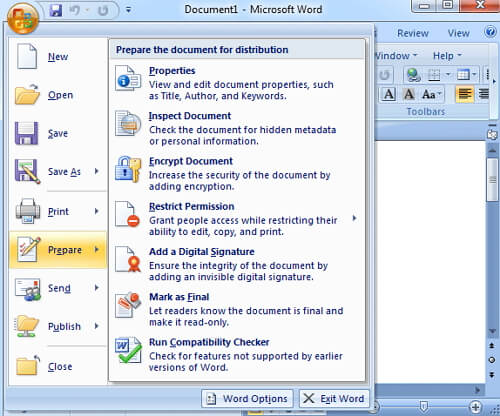
For Word 2007:
Step 1. Tap on the office icon in the top left corner of Word document and click on "Prepare" and then "Encrypt Word Document".
Step 2. Remove the password from the dialog box and then click on OK.
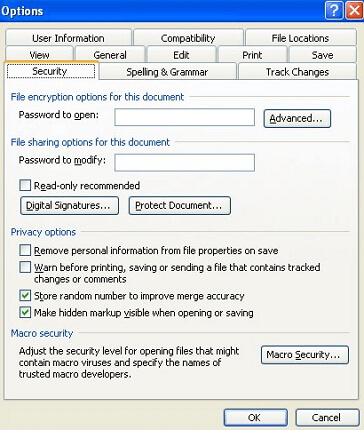
For Word 2003:
Step 1. Click on File > Save As.
Step 2. On the save dialog box, tap on Tools and then Security Options.
Step 3. Clear the password from the security box of Password to open.
Step 4. Finally, click on OK to save the changes.
Conclusion
Protecting Word files by adding a password can be a good way to protect the information in the document. But sometimes the password, especially if it is difficult to remember, can hinder the usefulness of the document. With the methods above, it is our hope that you are now able to find a way to remove password from a Word document with satisfied result.


